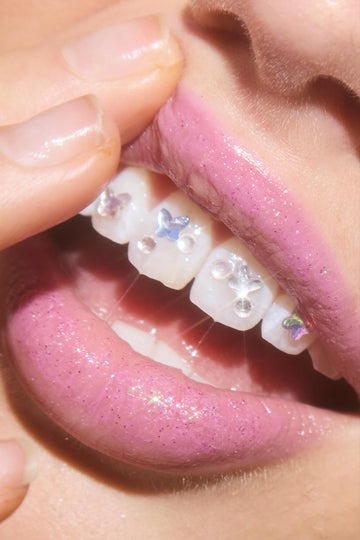
From runways to social media feeds, tooth gems have quietly become one of the most eye-catching ways to personalize your smile. What was once reserved for celebrities and high-end dental studios has evolved into an accessible trend embraced by young adults who want to add a little sparkle to their everyday look — without a permanent commitment.
Enter the DIY tooth gem kit. These all-in-one sets promise salon-style results from the comfort of your bathroom mirror, but they also raise some important questions. Is applying a gem to your tooth actually safe to do at home? Will it last? And could a wrong move damage your enamel? For first-timers especially, the gap between an exciting idea and a confident execution can feel wide.
This article cuts through the uncertainty. Whether you’re curious about how tooth gems are applied and removed, wondering how to find an affordable kit that doesn’t compromise on quality, or simply trying to decide if the DIY route is right for you, you’ll find practical answers here. Let’s explore everything you need to know before bedazzling your smile.
What Are Tooth Gems and Tooth Gem Kits?
Tooth gems are small decorative crystals, rhinestones, or jewels bonded to the surface of a tooth using dental-safe adhesive. Unlike permanent dental modifications, they sit on the enamel without drilling or altering tooth structure, making them a purely cosmetic choice. Their appeal lies in that sparkle — a subtle glint when you smile that can feel bold or understated depending on the gem you choose.
The practice of adorning teeth actually has deep roots. Ancient Mayan civilizations inlaid jade and pyrite into teeth as symbols of status and beauty. Today’s tooth gems carry that same spirit of self-expression but in a far more accessible, reversible form. The trend surged in the early 2000s alongside hip-hop culture and has since made a strong comeback through platforms like TikTok and Instagram, where smile aesthetics are very much part of personal branding. Many fans of DIY beauty who already experiment with at-home accessories — like press-on nails from brands such as Never Have I Ever — find tooth gems a natural next step in building a head-to-toe curated look.

A standard tooth gem kit brings everything you need into one package. Most kits include an assortment of flat-backed gems in various sizes and colors, a dental-grade adhesive or bonding gel, a UV or LED curing light to set the adhesive, a small applicator tool or tweezers for precise placement, and a cheek retractor to keep your mouth open and dry during application. Some kits also add an etching gel to prepare the enamel surface for better adhesion. Together, these components are designed to replicate — as closely as possible — the tools a professional would use, putting salon-style results within reach for anyone willing to follow the steps carefully.
How to Apply Tooth Gems: A DIY Step-by-Step Guide
Applying a tooth gem at home is entirely doable, but the process rewards patience over speed. Before you even open the adhesive, choose which tooth you want to decorate — the upper front teeth are the most popular choice because they’re visible when you smile. Avoid placing gems near the gumline, as adhesive contact with soft tissue can cause irritation.
Start by brushing and flossing thoroughly, then use the cheek retractor from your kit to keep your lips and cheeks clear of the work area. Moisture is the enemy of a lasting bond, so dry the tooth surface completely with a cotton roll or the air from a hair dryer on its coolest setting. If your kit includes an etching gel, apply a thin layer to the tooth for 20–30 seconds, then rinse and dry again — this micro-roughens the enamel so the adhesive grips better.
Tools and Materials Needed in Your Tooth Gem Kit
A complete kit should include flat-backed gems, dental-safe bonding adhesive, a UV or LED curing light, a fine-tip applicator or tweezers, a cheek retractor, and a small mirror. The curing light is non-negotiable — it’s what transforms the adhesive from a soft gel into a durable bond in seconds. When choosing a kit, prioritize one that explicitly states its adhesive is non-toxic and dental-grade, since anything less can irritate your enamel or gums over time.
Precautions and Common Mistakes to Avoid
Apply a tiny dot of adhesive to the flat back of the gem using your applicator — less is more here, since excess adhesive spreads onto the gumline. Press the gem firmly onto the prepared tooth surface, hold for a few seconds, then cure with the light for the time specified in your kit’s instructions, typically 30–60 seconds. The most common mistakes are skipping the drying step, using too much adhesive, and rushing the curing phase. Each shortcut shortens how long your gem stays put and increases the chance of irritation. Once cured, avoid eating or drinking for at least an hour to let the bond fully stabilize.

Safe Removal of Tooth Gems
Knowing how to remove a tooth gem safely is just as important as knowing how to apply one. Whether your gem has run its course stylistically or it’s simply starting to loosen on its own, the removal process deserves the same care and patience as the application.
The easiest DIY method works when the gem is already slightly loose: slide a piece of unwaxed dental floss behind the gem and gently work it back and forth with a sawing motion. The floss slips under the adhesive layer and pops the gem free without force. If the bond is still strong, apply a small amount of dental adhesive remover — some kits include this, and it’s also sold separately — directly to the gem’s edge. Let it sit for 30–60 seconds to soften the adhesive before attempting the floss technique again.
What you should never do is use a fingernail, a metal tool, or any sharp object to pry the gem off. Forcing removal can chip or scratch the enamel beneath, causing damage that no amount of sparkle is worth. Similarly, biting down on hard food in a way that levers the gem off puts uneven pressure on the tooth surface.
After removal, run your tongue across the spot — it should feel smooth. A little residual adhesive is normal and will typically wear away on its own within a few days of regular brushing. If you notice sensitivity, rough patches, or any discoloration at the bonding site that doesn’t resolve within a week, book an appointment with your dentist. Professional removal is also the smarter route if the gem is positioned near the gumline or if previous removal attempts haven’t worked, since a dentist can use specialized tools without any risk to your enamel.
Finding Affordable and Quality Tooth Gem Kits
Price is often the first filter people apply when shopping for a tooth gem kit, but cost alone shouldn’t drive the decision. Budget kits — typically at the lower end of the market — can work perfectly well for a first-time experiment, but they sometimes cut corners on adhesive quality or include gems with rough backing that can scratch enamel. Mid-range and premium kits tend to offer dental-grade adhesive, a more reliable curing light, and a wider gem selection. The sweet spot for most beginners is a mid-range kit that balances affordability with the components you actually need.
When evaluating any kit, check for three things before purchasing: confirmation that the adhesive is non-toxic and dental-safe (ideally with an ingredient list), a UV or LED curing light with a stated curing time, and flat-backed gems rather than pointed or faceted stones that can trap bacteria. Online retailers like Amazon carry a wide range of options with customer reviews that reveal real-world performance — pay attention to comments about adhesive strength and how long gems actually lasted rather than star ratings alone. Beauty supply stores and specialty cosmetic shops are also worth visiting in person, where you can inspect gem quality before buying.
Reading reviews strategically matters. Look for feedback from users who describe their application experience in detail, particularly around adhesive consistency and curing light effectiveness. A kit with hundreds of vague five-star ratings is less informative than one with fifty detailed reviews discussing longevity.
Comparing DIY Kits vs. Professional Tooth Jewelry Application
Professional application by a dental technician or trained beautician offers clear advantages: precise placement, higher-grade adhesive, and a bond that can last six months to a year with proper care. The tradeoff is cost — professional sessions typically run significantly higher than any DIY kit. DIY kits win on flexibility and immediacy; you can apply a gem on your own schedule, experiment with placement, and swap styles without booking an appointment. The honest comparison comes down to how long you want the gem to last and how comfortable you are with the application process. For casual experimentation, a quality DIY kit delivers solid results. For a special event or a longer-term commitment, professional application is worth the investment.
Pros and Cons of Using a DIY Tooth Gem Kit
DIY tooth gem kits have genuine appeal, and for the right person, they deliver exactly what they promise. The most obvious advantage is cost — a quality kit runs a fraction of what a professional session costs, making it easy to experiment without a significant financial commitment. That low barrier to entry also means you can try different gem styles, swap placements, and treat tooth gems as a rotating accessory rather than a semi-permanent fixture. The process itself is straightforward enough for beginners, and the satisfaction of achieving a clean, sparkling result on your own carries its own reward.
The disadvantages are real but manageable with the right approach. DIY gems typically don’t last as long as professionally applied ones — expect days to a few weeks depending on your kit quality, placement, and eating habits, versus months from a professional bond. The margin for error is also narrower at home. Skipping the drying step, using too much adhesive, or rushing the cure can lead to a gem that falls off quickly or, worse, causes gum irritation. There’s also a small but genuine risk of enamel damage if removal is handled carelessly or if a low-quality adhesive is used over repeated applications.
The honest verdict on DIY tooth gems comes down to intention. If you want to explore the trend casually, express your style for a specific occasion, or simply test whether a gem suits your look before committing to a professional application, a quality DIY kit is a smart, practical choice. If you’re after longevity and flawless placement for an important event, professional application is the safer bet. Either way, the key is choosing a kit with dental-safe materials and following each step with care — that combination eliminates most of the risk and maximizes your results.
DIY Tooth Gems: Making the Right Choice for Your Smile
Tooth gem kits have genuinely democratized a trend that once required a salon visit and a significant budget. For young adults curious about adding a little sparkle to their smile, the DIY route offers a low-commitment, affordable way to experiment — provided you approach it with the right materials and a steady hand. The key takeaways are straightforward: choose a kit with dental-safe adhesive and a reliable curing light, follow the preparation and application steps carefully, and handle removal with the same patience you brought to putting the gem on in the first place.
Safety isn’t complicated here — it mostly comes down to not rushing and not cutting corners on kit quality. A gem applied correctly on a clean, dry tooth with a dental-grade adhesive poses minimal risk. One applied hastily with a bargain adhesive is a different story. The same logic applies to removal: gentle and deliberate always beats quick and forceful.
Before you buy, ask yourself what you actually want from the experience. Casual style exploration? A quality DIY kit handles that well. A flawless result for a wedding or major event? Professional application is worth the extra cost. Either way, you’re now equipped to make that call with confidence. The sparkle is within reach — just go in prepared.